Programming EclypX Digital Access Control Keypad Address
Programming the address for each of your keypads must be done using our DiagnostyX software. By default, the keypad is shipped with an address of 52719. You MUST disconnect ALL other devices that are new and/or are on this address. If you do not, they ALL will be changed! Disconnection can happen by either removing power or data from those you do not want to program.
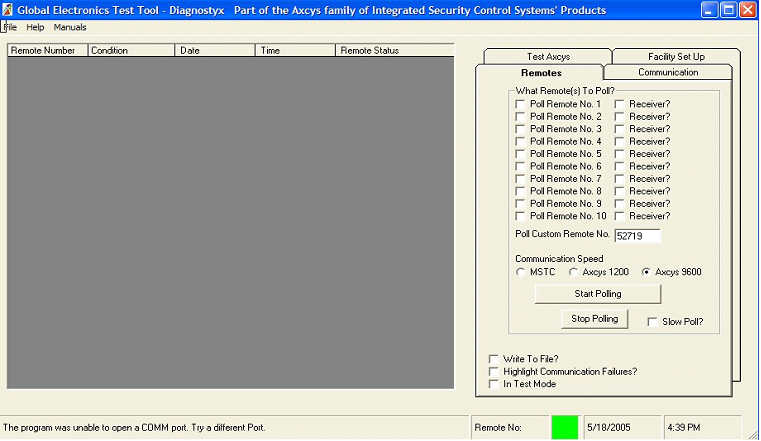
To change this set address, start DiagnostyX. Enter the address 52719 on the screen and click the button Start Polling. You will see records appearing on the main screen showing good or bad communication. Also the Red/Green box in the bottom of the screen will be green if good. If you are not receiving good communication, go to the trouble shooting part of this document for more help.
Once good polling is being achieved, click on the tab marked Test Axcys.
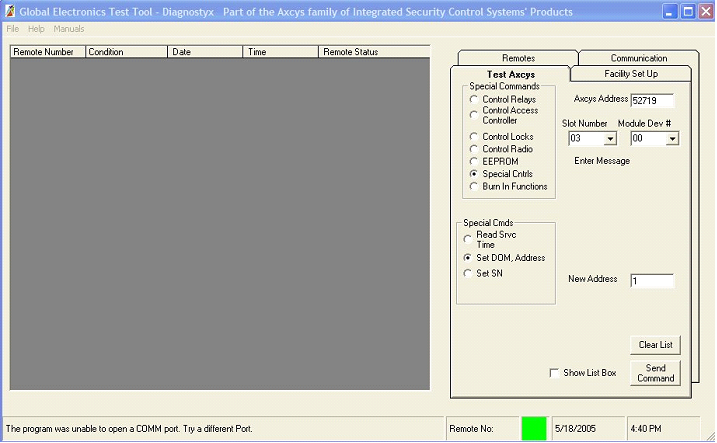
Enter the address 52719 into the field Axcys Address. Click on Special Controls. Then click on Set DOM, Address. Enter the NEW address you want this device to be set at in the field labeled New Address. Click Send Command button.
After setting the address, return to the remotes tab and click the Stop Polling button. It will then be necessary to stop and re-start the program.
|
!Warning
DiagnostyX was NOT designed to be a commercial product. While we have made every attempt to remove problems you may still encounter
Issues. Please forward any concerns to suggestions via email.
|
|
!Warning
It is possible to have more than one remote device installed with identical addresses. Units normally ship with a default address of 52719. However, we occasionally pre-set the addresses for units upon request by the customer.
|
|
!Warning
Disconnect all remotes having the same address number from the daisy chained line by either removing their power or data cable.
|
Programmable Features:
|
important
Some features available only on models shipped after 3/09 – or having been re-programmed after 3/09
|
Both the BasicX and EclypX models include programmable features to allow the user to customize the look and feel of these keypads. These features are programmed using Diagnostics and and Axcys / Axcys Embedded. All may be “reset” to factory using Diagnostyx. The features include:
1. Date & Time Format – User can select either US or UK/EU date and time formats. 1. UK/EU Format: Date: Day/Month/Year Time: Hrs: Minutes Hrs Example “19:50 Hrs”2. US Format: Date: Month/Day/Year Time: Hrs: Minutes Am/Pm Example “7:50 PM”
2. Keypad Display Language – All Global Electronics' keypad products can be customized with the users language. The user is able to “free-form” enter messages for the tenant to see and understand in their own language. Certain characters however cannot be display such as certain Russian and German characters.
3. play Messaging – There are several levels of display messaging available to the facility. The two main types of messaging are Response Messages to tenant input, and Instruction Messages. - NEW 10/10/11 Axcys Ver 5.1 and higher
**Note ** if you elect to use custom messaging, ALL messages must be used – you cannot use a combination of custom and non-custom. Although, you CAN copy the standard messages and utilize them if you like.
1. Response Messages – There are many available. The main Response Messages include messages for “Locked out”, “Invalid Code”, “Greeting” and “Good Bye”. These are all set up in the main software (Axcys or Axcys Embedded).
2. Instruction Messages – These are messages that are programmed into the Keypad. Although all keypads are typically set up the same, each keypad can be differently but requires a little more set up work to accomplish. Global recommends keeping all keypads the same.
Instruction messages include -
*All are customizable with your language as you see fit. The following demonstrate examples only.
*All but the second line of PIN Code Entry may have 20 Characters available. PIN code entry may have at most 8 characters.
Line 2 Instruction - The default for this instruction is: "Press * Your Code #". This instruction appears under the Date and Time. It rotates with your greeting screen.
Pin Code Entry Instruction
1. Line 1 - "Enter access code "
2. Line 2 – "Code:"
Sending PIN Notification
1. Line 1 - "Sending access code "
1. Security PIN Mask Entry– The PIN code may be masked by any character the user desires OR the actual PIN may be displayed. The default setting is to display the PIN on entry. Mask characters include characters such as * & # $. However there is no limit to which character may be chosen providing virtually all ASCII character, aside from special Russian, German or Chinese characters.
2. Set Display time - Default is 3 Seconds per message. This number may be over ridden by user action (a key press for example).
3. Automatically open the gate after communication loss of x seconds. Settings are between 0 and 254 seconds where 0 has the affect of disabling the option. The default is zero(0) – disabled. If this is set to zero (0), the device will automatically re-start itself approximately every 120 seconds (added 9/28/09)4. Adjusting the Touch pad “Feel” is accomplished by adjusting the interval in which the keypad checks to see if a user is depressing a touchpad button. The setting is in milliseconds and user settable from 0 to 65535. Default is 70mS. Making this value HIGHER will have the result of lessening multiple entries for the same keypress (111, 22 etc). Making the value lower will have the result of a more sensitive touchpad.5. KEY UP – New 9/15/11 – KEY UP is a feature that combines “Touch pad Feel” with forcing the user to release the touch pad Key before it is recognized. No audible “beep” or number will be displayed on the LCD without the key being release. For those customers who have particularly slow tenants, or are used to a “press and hold” configuration, this feature allows you to adjust the keypad to your tenants particular taste. This feature is the default of the keypad (beginning 9/15/11) and is coupled with the touch pad “feel” setting. Touch pad feel settings below 2000 automatically incorporate KEY UP. Values over 2000 do not use KEY UP.
6. How long to wait for a response from the host; displays no response from host after this timeout. Default is 15 seconds
7. How long to wait for a user to finish putting their code in the touchpad ( and hit the Pound key). The default is 15 Seconds, maximum is 60 seconds.
8. How often to check the gate monitor. User settable from 0 to 254 seconds where 0 has the affect of disabling the option. The default is disabled. This should only be used when the options have been purchased. Otherwise false signals may be sent to the computer.
9. Reset to factory default settings. If you are using certain features, such as a gate or door monitor, you will need to adjust these settings back to your preferences. The reset command returns all saved EEPROM settings back to default
10. Communication Settings:
1. Beginning 10/20/09 both the BasicX and the EclypX have user programmable RTS delay settings. These are used to customize the speed for polling and responding to the computer. In some cases, such as a slower computer or older Communicator, may require these settings to be altered from their factory settings in order to make communications solid between the KP and the computer.
2. There are 3 settings, RTS1, RTS2 and RTS3.
1. RTS 1 is before replying to the computer and before setting the state of RTS
2. RTS2 is also before replying to the computer, but it is after setting the state of RTS.
3. RTS3 is after the reply is sent to the computer, and determines how long to hold the state of RTS before changing it to be ready for the next poll by the computer
The factory defaults for the three settings are:
If Modem: RTS1 =30 RTS2= 90 and RTS3 = 25 'revised 5/4/10 from 30/30/25
If RS485: RTS1 = 0 RTS2= 90 and RTS3 = 5 (10 in the case of Muxes)
Use these in conjunction with Delay 1 for FSK Modem Communication settings. Lowering
Delay1 Setting to 50 mS may help speed up and better communication with modems.
|
!Warning
Changing these settings can cause the unit to NEVER respond! Make changes in very small increments (like 1 or 2) and very carefully! If communications are stopped, make the sum of RTS 1 and RTS2 greater than 150 then follow the steps below.
Next turn off the power to the KP, wait 10 seconds, then turn power back on. This will force these settings back to the original factory settings. You may also use the “Re-Start Device” command within DiagnostyX to perform a system re-start. This will accomplish the same result.
|