<TODO>: Insert description text here... And don't forget to add keyword for this topic
The conventional two-wire method is the most dependable splicing method. It is commonly used and is very dependable.
when there are multiple doors in many directions, but is also very effective with long hallways. The main challenge with this method is that it increases the amount of wire required. Also, it is extremely important that the grounds be stepped down correctly. Plan the site to allow for extra channels on the multiplexer and extra conductors in the trunk line for service
1. Trunk line can be used for this method if there are multiple doors along a single hallway. CAT5 network cable can be used for smaller groups of doors and individual 22 AWG or 24 AWG, 2-conductor twisted pair cables can be used to go out to individual doors. Do not use CAT5 network cable anywhere else in the system (except for an Ethernet cable where required).
2. Run the lead cable from the door switch up to the trunk line. Use wire ties to tie a small bundle of wire near the switch for future maintenance and service. Use wire ties to tie the wire bundle and the wire to the wall or to the door track every 2 feet up to the trunk line.
3. If using individual 22 AWG or 24 AWG, 2-conductor twisted pair cables for each door, skip to step # 7.
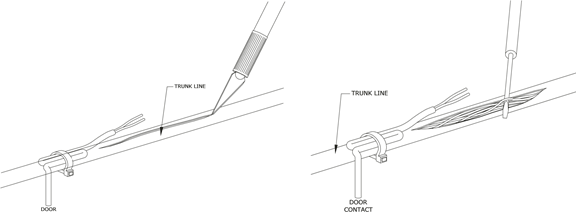
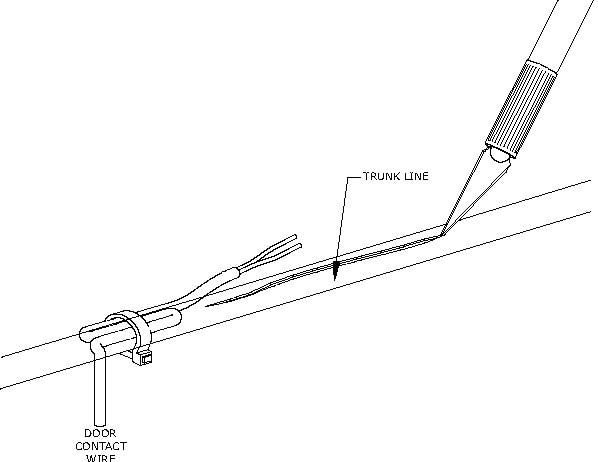
4. If using trunk line or network cable, use an exacto knife or other small razor knife to cut a 2 inch slit into the trunk line jacket on the switch side of the door. Be very careful only to cut the jacket and not the conductors underneath.
5. Spread the slit open and use a wire extractor or blunt precision screwdriver to sort through the wires to find the two correct wire colors for the signal and ground. The recommended wire color code order can be found on the Mux and Channel List chart on pages 18 – 19.
Cut a small slit in the trunck line.
Pull the Ground/Return wire as well as the *single* wire designated for this particular unit.
Use your favorite crimp connector to join the two wires. Wrap with electronical tape once completed.