Axcys Facility Security Controller Rev2.1
By Global Electronics, Ltd.
Quick Start Guide
Notes:
1. Use ONLY 12V DC power supply provided
2. Use 10/100 switches, currently the system does not support Gigabit switches.
3. Check to be sure all circuit boards are pushed down properly. In some cases, during shipping the daughter boards will shift and/or become loose. If they have detached themselves, insert them so that each of the 6 pins, on both sides of the daughterboard are mated to the 6 pin recepticles on the main board.
4. In some cases, a trained On-Site IT person may be necessary. Particularly when permissions issues arrise, preventing connections between the Controller and your existing Client PC's.
5. During initial turn-on, you may need a VGA monitor, USB keyboard and USB Mouse. These are not always necessary but may be helpful especially if you have trouble with getting the unit onto the LAN/Internet.
6. Do NOT use the Controller as a Power Supply for the other parts of your System. The 12V Aux connector is only for use with the Test Cable.
* Make sure all cable connections are plugged in all the way – they may have loosed during shipping *
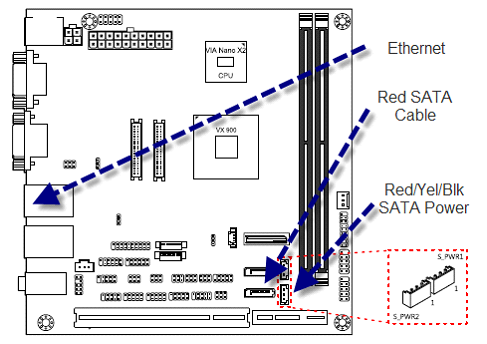
1. Plug in the SATA Data, SATA Power cable and Ethernet cable to the motherboard.
Red SATA Cable should be plugged into location SATA1
The Red/Yellow/Black cable should be plugged into the S_PWR1 connector
2. Check connection of SATA cable and Power cable plugged into the SSD on the left side of the controller (when oriented so that the fans are facing away from you).
3. Plug in your Ethernet cable to either of the two Ethernet ports.
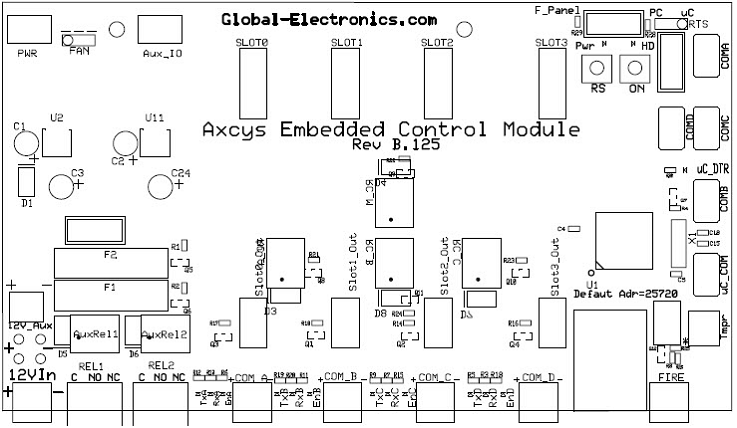
4. Connect the Keypad and Alarm Data cable to COMA on the motherboard
5. Using the supplied 12V power supply, connect it to the 12VIn connector located on the Main Embedded Controller board.
In most cases, the system has been preconfigured for your particular location. In some cases the controller will automatically start when the power connection is made. In other cases, you may need to press momentarily the ON button located on the Controller Board.
The Control Module (below) must be connected to the Keypads by attaching the data wires to/from the access control keypads to COM A, unless otherwise specified. These are polarized, meaning there is a positive and negative wire. If you are migrating from an MSTC system, there is a 50/50 chance that the wiring will be correct. If it does not work, the two data wires must be reversed. No damage will occur by having the polarity of these reversed however.
Turning ON the Controller
In some cases the controller will automatically start when the power connection is made. In other cases, you may need to press momentarily the ON button located on the Controller Board.
Mounting and Cooling
The special Controller Motherboard has been designed for industrial applications, and has been hardened for temperature and adverse environments. The following are Globals recommendations and best practices for mounting and cooling the Controller.
When mounting the Controller, choosing a location that is cool and dry is imperative. An air conditioned environment is not necessary so long as adequate airflow is provided so that the ambient temperature is maintained within specified limits. Dry, outdoor locations are fine, so long as conditions are within specified limits.
The preferred mounting method is to have the fans facing UP or to the cover facing up. Similarly to an office computer, under no circumstances should the intake area, nor the exhaust fans be blocked. Also the Controller was designed to have the cover in place under normal operation. This helps to direct airflow as engineered.
LAN Connections
The Controller comes with Windows 7 Home Premium installed and configured specifically for Self-Storage purposes. Global recommends NOT adjusting any of the settings from factory defaults. There is a single Windows user created and has been configured for automatic login on boot. This allows the system to start with no human input, either from a power resumption, or from a reboot. Two Ethernet connections are availble for use. Either can be chosen by the user. The default Win7 login is Axcys, the default Win7 password is axcys. This enables a Win7 home group to be used.
Ultra VNC
Depending on the product installed on the Controller, VNC may need to be installed on the controller and on the Client computers to provide managers a means to view facility activity and/or request reports. The Axcys/Support Folder will include a copy of Utra VNC. Alternatively, Ultra VNC may be found at http://www.uvnc.com/ This is a free product.
If using Axcys Facility Security Management, VNC is not required since this product provides its own specially designed Client User Interfac software.
UltraVNC Server is installed and running Password is axcys1234
Viewers
open port 5500 5800 5900 for vnc
Set System Date And Time & Time Zone
The Controller ships set with the then correct Date and Time for Arizona. Please change the date and time along with the Time Zone using Windows standard methods for adjustment.
System Update Interface
Both Axcys Security Software and the Axcys Facility Security Management System have been designed to interface with most all of the worlds property management systems (PMS). Typically, the PMS is set to drop its file in a certain location, either on the controller or on a Client PC. The Axcys system is set to look for that same file in the same location. Once Axcys sees that file, it acts on it, then moves it to a history folder. The file is date and time stamped for futre use if needed.
To utilize this, either the Client PC or the Controller must be set to share a folder, and appropriate permissions set to allow access to that folder (read/write- full). To set the PMS, please consult your specific PMS systems documentation or support. For assistance with Globals products, please contact Globals Technical Support at support@global-electronics.com or call 602-437-8005.
Optional System Update Interface:
Global provides a special interface file transfer product that can be used either for Axcys Security Software or the Axcys Facility Security Management System. It provides a means to transfer the PMS generated interface file from a Client PC to the Controller across the users LAN. There is almost no configuration to perform, simply download from the Global Website and install each part of the software (one on the Client PC(s)) the other on the Controller. If using Axcys Facility Security Management System, there is no connfiguration necessary at all. If using with Axcys Security Software, the is a small configuration to perform on the Controller side only. See the manual for more information.
Install Local Printer:
Please install at least one printer on this Controller - a Generic printer will allow reports to be printed to the screen.
Install Networked Printer:
Please install at least one printer on this Controller.
For help with Printer Setups, please contact support. Although not network specialists, we often can help with these and other challenges.
Contact and Support
Telephone 602-437-8005